jan.bio
Creating pure CSS buttons
You've probably seen those small buttons that are linking to RSS
feeds, the Xhtml Friends Network, GeoURL, etc. on many blogs and other
sites. A typical button looks like this: 
Usually, these buttons are statical GIF or PNG images. However, in this article you will learn how to create them using the Web standards XHTML and CSS. First of all, you need some markup.
<a href="http://gmpg.org/xfn/" class="btn"><span class="btnFront">XFN</span><span class="btnText">Friendly</span></a>
The button is split in two parts: one coloured part, which usually contains an acronym, and one text part. Since buttons are links, we don't want to put another element around the link. However, we have to split the link into the two parts using two tags. Next, we have to write the CSS code for the surrounding link:
.btn {
display: block;
padding: 1px;
border: 0;
margin: 0;
text-decoration: none;
background-color: #666;
height: 15px;
width: 90px;
}
We use absolute values for the width and height of the button and turn off underlining of the link. Once we're done with that, we have to style the link parts:
.btnFront {
float: left;
font: 10px Arial, sans-serif;
display: inline;
background-color: #f90;
color: #fff;
padding: 0 2px;
border: 1px solid #fff;
margin: 0px;
width: 20px;
}

.btnText {
float: right;
font: 10px Arial, sans-serif;
display: inline;
background-color: #898e79;
color: #fff;
padding: 0 2px;
border: 1px solid #fff;
border-left: 0;
margin: 0px;
width: 59px;
}
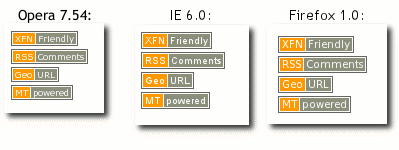
We use a fixed-sized font as well as floats to divide the button into
two parts. A white border is added to these spans. This is the result
displayed in some browsers: 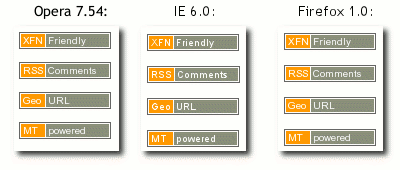
Although, this approach looks nice and is pretty close to the graphical buttons, it has some drawbacks. First, since we're using a fixed button size, the text on the button might overlap the actual button. Second, we're using floats to align the contents of the button. This might lead to problems, if the button is used within floating environments. Therefore, we'll create a second version of the button, which uses a relative font size and no floats. The markup - as often is the case using CSS design - is the same for both versions. We'll create the following CSS for the link tags:
.btn {
display: inline;
font: x-small/200% Arial, sans-serif;
padding: 1px 0;
border: 1px solid #666;
margin: 0;
text-decoration: none;
background-color: #fff;
}
We are using a relative font size for the button. 200% is the height of the line containing the button. As in the first version, we now create the code for the two parts of the button. Note, that this time, we don't use floats to align the parts:
.btnFront {
display: inline;
background-color: #f90;
color: #fff;
padding: 0 2px;
border: 1px solid #fff;
border-top: 0;
border-bottom: 0;
margin: 0px;
}

.btnText {
display: inline;
background-color: #898e79;
color: #fff;
padding: 0 2px;
border: 0;
border-right: 1px solid #fff;
margin: 0px;
}
Now we are done! The buttons will not display correctly in IE 5.5,
because of the different box model, but you can apply the Box Model
Hack to fix this. You can also add the usual attributes to your link,
like access keys, link titles, etc. Again, here is the result
displayed in some browsers: